Tuesday, May 24, 2011

Giveaway...

I'm giving away FIVE prizes on my other blog (MLBB)... you have until May 31st to enter! Head on over!
The FIVE prizes are my hand made designer fabric accordion files... in 3 different sizes!!!
THERE WILL BE FIVE WINNERS! GREAT CHANCE THAT IT COULD BE YOU!!!!

Thursday, April 14, 2011

Which Remodel do you like the most?

An easy way to redecorate on the cheap is to modge podge fabric to your decor piece. I got the desk from my sister but it isn't quite finished... which fabrics do you like best?

Desk 1 Avacado Damask by Michael Miller
Desk 2 Black and Cream Damask by Joel Dewberry
Desk 3 Aviary and Orange Damask by Joel Dewberry
Desk 4 Aviary & Orange Damask by Joel Dewberry(Oh crap...thought... these(orange and turquoise) would look sooo good if I painted the desk WHITE, what do you think about that too?)
Desk 5 Orange Damask with a touch of Aviary by Joel Dewberry
Desk 6 Gray and Yellow Damask by Joel Dewberry

Saturday, March 19, 2011

Pictures...


Bow/Jewelry Holder...
*Holes filled, Sanded, painted, antiqued, glazed, and accessorized!!!

Nails for hanging headbands and all Miss Plunkett accessories... 

Key Rack...

1x2" piece of wood sanded, primed, painted, antiqued, glazed, old hardware painted antiqued and glazed added on, dried and hung with adhesive velcro!


The best part, I had EVERYTHING I NEEDED SO I DIDN'T SPEND A PENNY TO DO THIS! Of course I had to spend some money at some point so if you were to go out and get the stuff... I would guess it would cost about $5-7 for the key rack(wood and everything, but not the antique hardware). And if you happen to have a broken rocking chair lying around, it would be the cost of paint, glaze and nails... also about $5-7... use seashells from past beach vacations... even more memorable of a piece.

A Key rack and a Bow/Jewelry Holder

Yup I finally have a little something to show you again. I have been doing tons of crafts but usually forget to take pictures, then I forget what I have done. Some of them include baby ruffle bums and rolled rose clippies(I have finished product pictures but no along the way pictures) and then I finally made myself a key rack... we are always loosing our keys... now we just need to create the habit of putting the keys ON THE RACK! LOL!  And I made an adorable bow/jewelry holder... and one more is on it's way as I have way too many bows and headbands to fit on one!

On my other blog, before I began this one, I posted about a broken rocking chair. We got the rocking chair for free. It was one of those nice gliders with an ottoman and had cream cushions. We really liked it but I think itmust have had quite a bit of use before we got it and then somuch more when we got it because it just plain broke, some of the wood bars split and it would have been difficult to make it back into a rocking chair.

 None the less, I didn't want to just throw it out. The seat of the rocking chair and the ottoman base were perfect for a note holder... but even better for bow and jewelry holders... the back of the chair... I'm hoping to make a pot rack... just haven't decided how yet.

It is inspired by this ladder pot rack. Cut huh? I don't know how to make mine that cucute so I'm still thinking...
I also have ussed the stuffing and cushions for a couple of things already. My baby bassinette needed a "mattress" pad and I also used the stuffing for some plush toys!

(I also built the frame for the bassinette, still needs to be painted though)

To say the least, I am getting as much use as I can out of this chair:)

Pctures of key rack and bow holder are under way...

Friday, January 28, 2011

Infant Car Seat Cover & Canopy

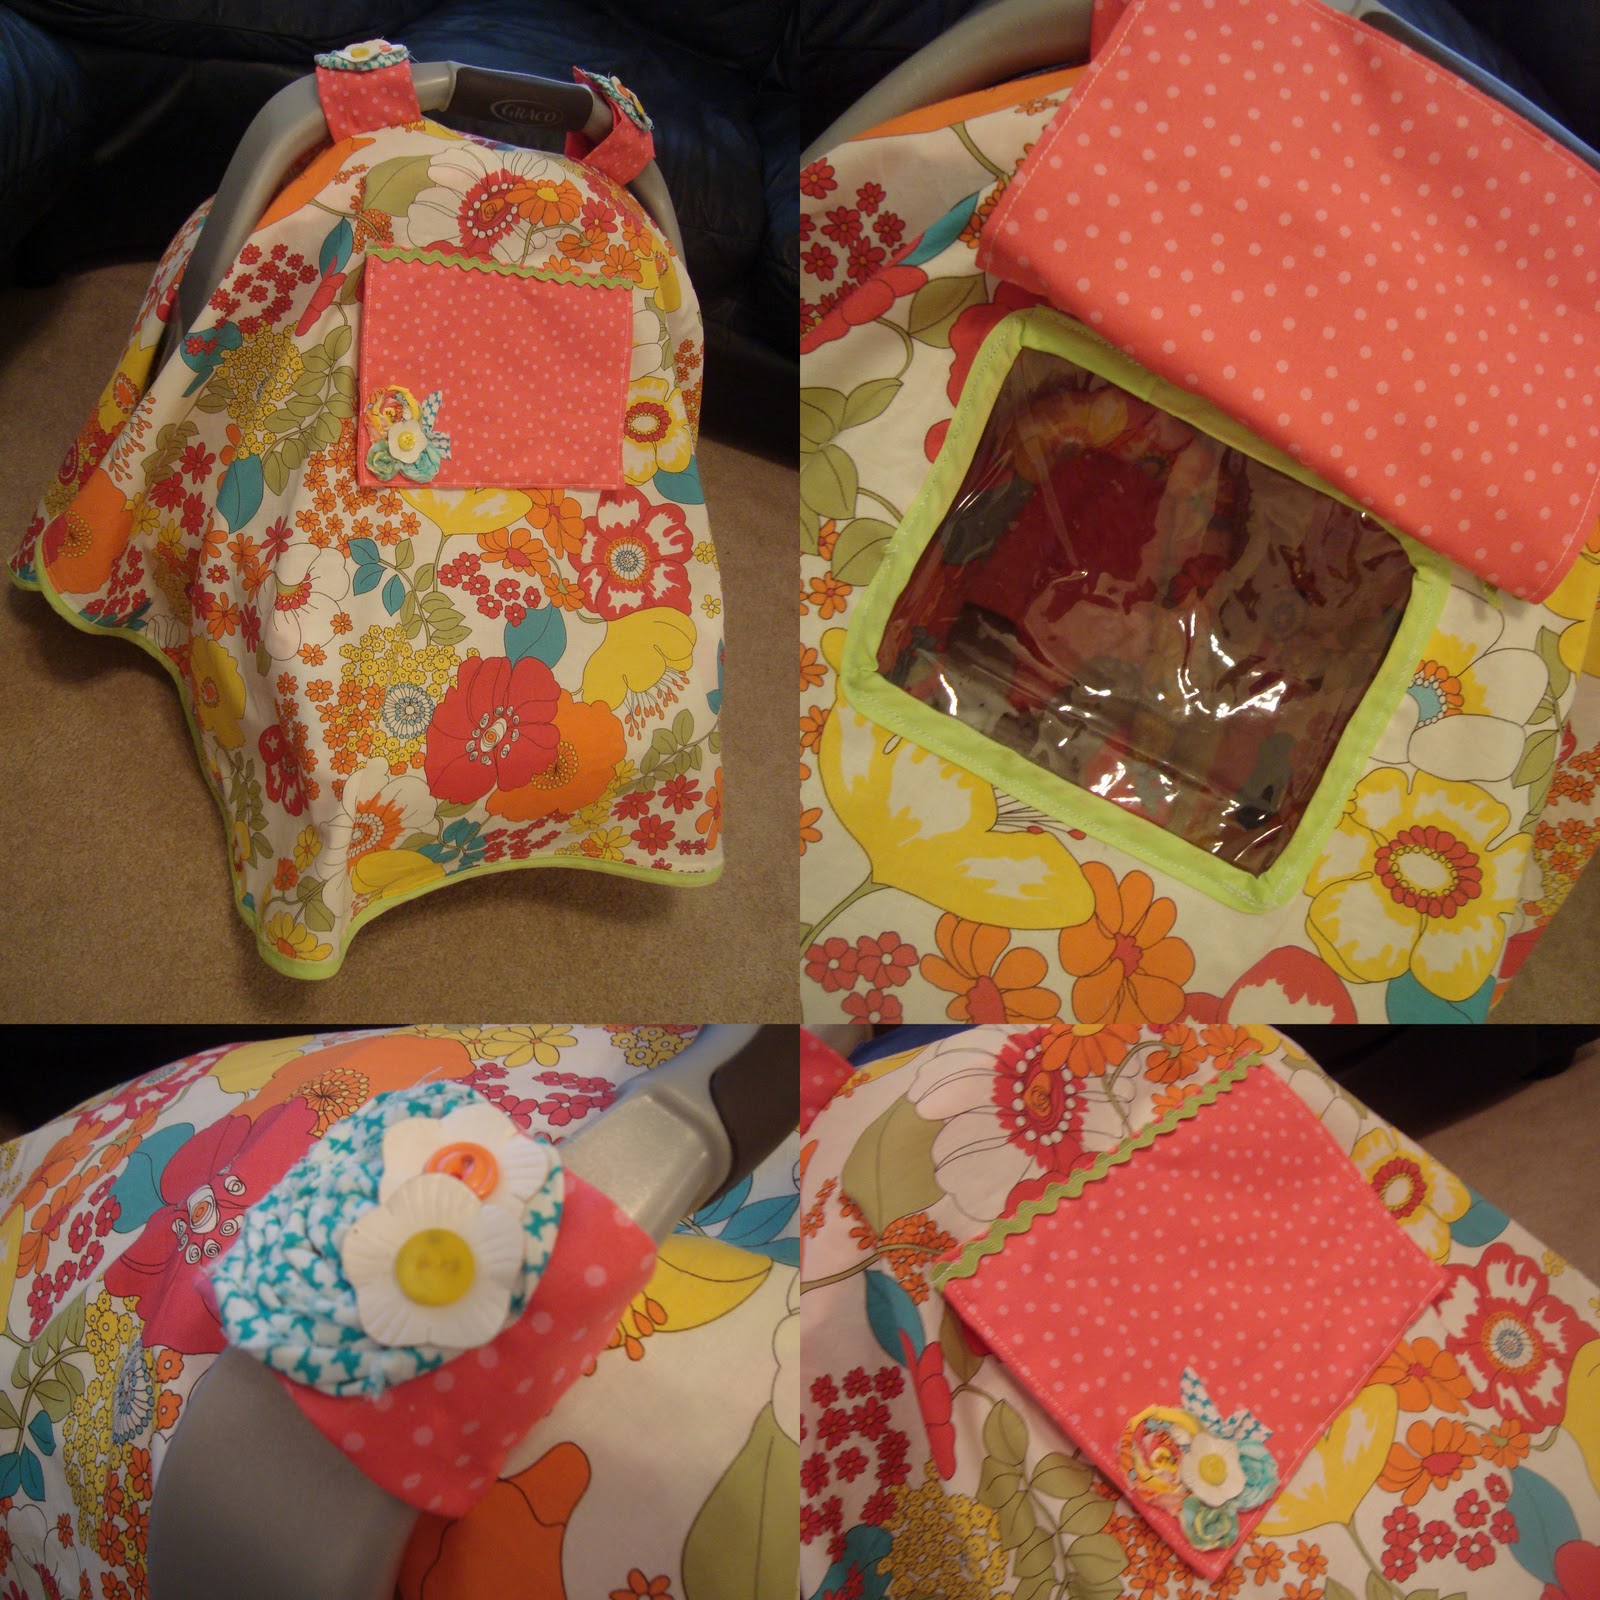
So I may not have new pictures of the kitchen but I do have pictures of the infant car seat cover and canopy I made.

I took this project on about a week after we moved into our new place and although I don't know how many hours it took, I worked on it over the following week and finished it all. There is one detail that is missing from this picture and I have yet to take a picture of it yet but I'll explain that in a minute.

At first, I just stared at the car seat trying to figure out how I wanted it to look and how to do it all together because I did not have a pattern(I rarely use a pattern anyway).  Finally I figured out what I wanted and here it is, sorry no steps leading to the finished project...

This is the car seat cover, shade and head rest pad...

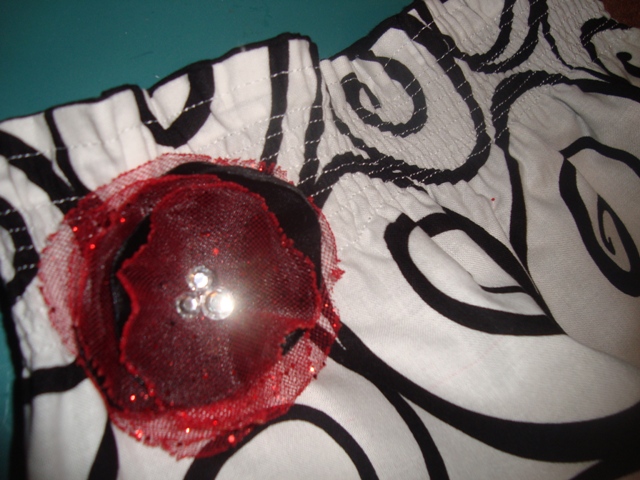
 Details of the inside lining of the shade(I love the alternating fabric) and bias tape to seal in the elastic band and keep it snug. Rolled rose appliques with white leather flowers and buttons on the velcro straps

And The matching canopy. I debated on having ruffles around the bottom but obviously went without.

There is a window for viewing so that no ones nasty colds or other sicknesses get rubbed all over my baby.

I saw this idea in a little baby boutique at a hospital, they included elastic on the bottom front so viewers couldn't just lift the canopy, I debated on that too but then I figured I would be taking her in and out enough that the elastic might bug me.

I also put slits down the side where the handles are so that it wouldn't bunch up, I have not seen this done but I liked the idea.

The straps are velcro with the rolled rose appliques, white leather flowers and buttons for cuteness.

The window has matching appliques... and as I said, there is one detail missing from the picture, I added a little white iron on vinyl  "Peek A Boo" to the window so that people would figure out that it is a window not a pocket. It is really cute, just haven't taken a picture yet.
One of the best parts is that I have had all the supplies(fabric and all) minus a bit of bias tape for a long time and was waiting for the perfect thing to make with it. I love how it turned out and I am so excited to have my baby girl arrive so we can take her home in it too!

My kids have been practicing playing Peek A Boo with a doll in it already.

Tuesday, December 21, 2010

This kitchen...

So since the last post about the kitchen I still haven't done anything... Christmas is just a few days away and I have changed my last minute plans to this...

-a baking rack in the oven
-still have a curtain
-I'll make the apron and mitten for her birthday that comes in a few months
-and labels in those little metal things below each cubby hole... dishes, oven, food, and pots & pans

and there is also part of the kitchen I have not taken a picture of yet... I have the cute wooden mock shutters that open up to a chalk board and pin board that will hang above the kitchen:) It is a cream color and distressed too! Super cute! I'll show you a picture when it is all set up in her room after Christmas!

Wednesday, December 8, 2010

Here is the Smocked Skirt!

 So I kinda got ahead of myself on things again... there are only the after shots. BUt I followed the directions from the tutorials posted previous to this, I have an elastic at the top of the waist line and then I did the smocking wit the elastic thread in the bobbin, the only difference is that I already had my skirt in tube form so instead of having to cut after each line of elastic thread was done, I  just did a spiral effect and kept turning the skirt as I sewed. I LOVE IT! and I hope my little girl does too! 
I'll make a matching tie for my little guy too.. minus te red sparkly tool! :)