So since the last post about the kitchen I still haven't done anything... Christmas is just a few days away and I have changed my last minute plans to this...
-a baking rack in the oven
-still have a curtain
-I'll make the apron and mitten for her birthday that comes in a few months
-and labels in those little metal things below each cubby hole... dishes, oven, food, and pots & pans
and there is also part of the kitchen I have not taken a picture of yet... I have the cute wooden mock shutters that open up to a chalk board and pin board that will hang above the kitchen:) It is a cream color and distressed too! Super cute! I'll show you a picture when it is all set up in her room after Christmas!

Because as a mom of two, almost three, I really need time for myself and what better way to spend it than to create with my own two hands. My crafts/projects will range from modge podge, vinyl decor or shirts, sewing and tutorials(my personal favorite), and painting small items to very large items. I am not afraid to try anything but I do have a limited work space and area to decorate until we are able to get a home of our own.
Tuesday, December 21, 2010
Wednesday, December 8, 2010
Here is the Smocked Skirt!
So I kinda got ahead of myself on things again... there are only the after shots. BUt I followed the directions from the tutorials posted previous to this, I have an elastic at the top of the waist line and then I did the smocking wit the elastic thread in the bobbin, the only difference is that I already had my skirt in tube form so instead of having to cut after each line of elastic thread was done, I just did a spiral effect and kept turning the skirt as I sewed. I LOVE IT! and I hope my little girl does too!

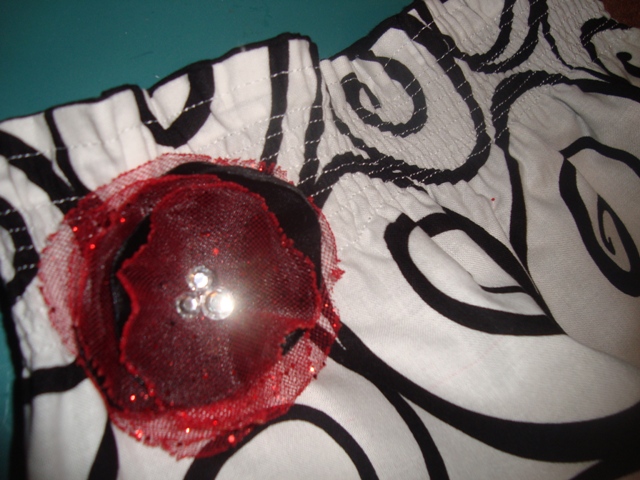


I'll make a matching tie for my little guy too.. minus te red sparkly tool! :)
Sunday, December 5, 2010
How to Smock/Shirr fabric
I am making a cute little skirt for my little girl for Christmas and have been wanting to try smocking the waist line. I have not smocked anything yet and always thought it would be difficult to do until someone told me about threading the bobbin with elastic thread! Are getting the picture on how easy it can be? Well. here is a tutorial I found that that explains it very well and I will be following as I smock!
I'll take pictures of my smocking process too and post them later on! I'm so excited!
Saturday, December 4, 2010
Toddler Kitchen...sneak peak
So I kind of got ahead of myself on this one, I didn't take pictures of every step like I had planned but it still isn't QUITE finished. I need to make the curtain, put an oven shelf in, make an apron and a mitten, and repaint the muffin tins, then I'M DONE!
Here are just a few pictures:

Here are the steps kind of anyway:
-cut out holes for sink and faucet
I spent quite a bit of time getting those holes cut out because I really didn't have the right tools to use, a dremmel tool isn't best but a table saw isn't great either for making a hole but the two together, I eventually got them done, like 2-3 hours later.
-cut a door for the oven from scrap wood

-wiped everything down
-did like 4 coats of primer(wish I was using primer in a spray can instead of with a roller, would have been much easier but I had to do this project indoors since I live in winter wonderland and don't have a garage)

-then I did like 4 coats of pink paint

-sanded a bit
-antiqued a bit
-put the sink in and the faucet in

-put hinges on the door and a handle
-have tension rod ready for the curtain
- put some vinyl cutouts in the sink and on the oven door(my daughter requested not only a pink kitchen but a pink sink too for Christmas, I have warned her that I don't know if Santa can do both)
-cut out brown vinyl circles for stove top-may change that a bit, still not sure.
NEXT I'll sew the apron, mitten, and curtain
-repaint the muffin tins too.
Friday, September 24, 2010
Blog name...
So now that I have started this blog, I really don't know if the original title I picked is appropriate when thinking of how or when I do crafts.
Currently it is One Project At A Time because that is usually what I try to tell myself to do but again, since beginning this blog, my craft projects have been well, more than ONE at a time! Here are some names I have been considering...
Never One Project At A Time
Holy Crap Crafts
Holy Crap I NEED to Craft (I just said this one as I was overwhelmed by crying children)
20 Minutes to Craft and Blog about it too (so I can have me time)
DI Crafts(as we all know now that I love the local DI)
I think my favorite one today is Holy Crap I NEED to Craft... fits my current situation perfectly.
I don't know if anyone reads this blog yet but if you do, any thoughts on the name?
Tuesday, September 21, 2010
For UTE Fans only! Iron On Vinyl Project...
All you Ute Fans should enjoy this one. All my friends that are BYU fans, go check out someone elses blog this time around, lol!
My husband and I thought it would be fun, and less expensive, to make our own Ute Gear. Until about 3 weeks ago the kids and I had no Ute Gear at all. I did however score a $5 soccer or volleyball sport shirt from last year and it is super comfy. I love it.
Anyhow, Here is what we did.
Step 1: Buy shirts, sweaters, hats or whatever you want...
this one is for my lil girl

Step 2: Buy Iron on Vinyl we went to spot89.com because in the end they were the cheapest per foot of iron on vinyl although you do have to buy a good amount so we have a little extra(not as much as expected due to some mishaps..uhum...the person will remain nameless)
this one is for my future line backer lil boy

Step 3: Cut out designs and words on my Personal Cricuit Machine
this one is for my hubby

Step 4: Iron on to parafanlia(glossy side up... this will reduce the mishaps...)
the white shirt is mine, the black my hubbies, and the black hoodie is mine too:) I still want to add to the front of the white shirt and do something on the back of my hoodie


Step 5:Peel off glossy covering(if you are layering multiple vinyl cutouts, do one at a time and remove the clear vynil before applying the second layer...and so on. This will also reduce the waste from mishaps...lesson learned!)
Step 6: Cheer For the UTES!!!! Go Utes!!!!!!
Daily Check List Board
So plain and simple... I created a daily check list board. I have seen so many varieties on different craft blogs and love a few from the magnet board version, magnet board on a cheap cookie sheet version, white board version, the picture frame white board version, and many others.
Well, Mine is really none of those with the acception of the white board capability. A while back I thought I would use these odd sized cabinet doors that were discarded by my amazing cabinet making brother. He left them in the wood pile at my parents cabin so I figured that was fair game. I tried painting them with some paints I had, I didn't like how they turned out so they have been sitting around for a while.
I used one for a Family Home Evening Chart... (Sorry I didn't do a step by step on this one, but you get the idea right?)

And this is the one I used for my Family Daily Check List Chart...
1) I modge podged the inner piece of wood then place the fabric over the wet modge bodge

2)smoothed out the fabric
3)Then I modge podged over the top of the fabric and let it dry.

4) printed little charts for each family member(I know this part could be much cuter but I was going for fast and simple)
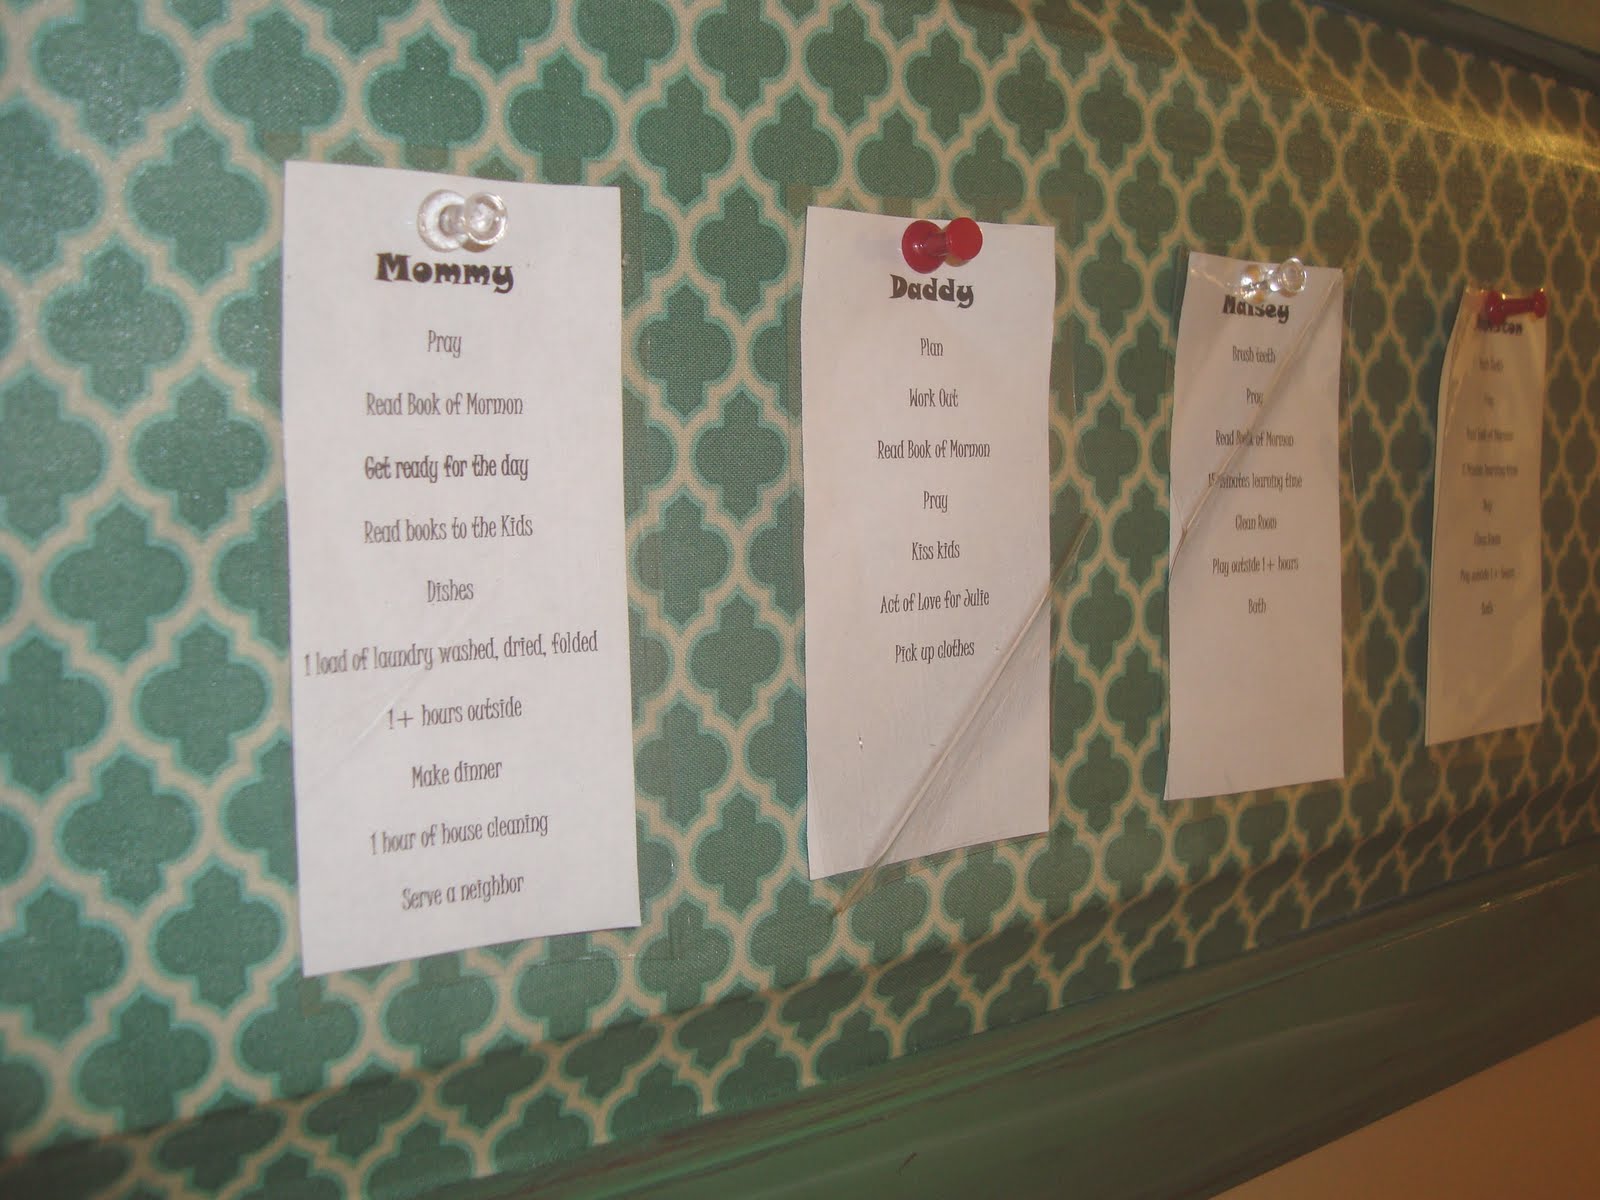
5) I used the clear oil cloth covering for each list and pinned them in place.

Now we can just mark right through what we accomplish each day... sad as it is, I do need reminders for even basic daily things. LOL.

Friday, September 17, 2010
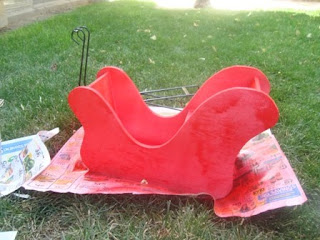
$1.00 Christmas Craft from DI
So by now you can tell tha tI like the DI for craft projects. It works out so well and the DI near me actually has lots of items with potential, you just have to envision it. This one however, didn't need much envisioning...
This Santa's Sleigh was only $1.00 and on the bottom it had a Robert's crafts sticker for $15! Yup, I got it for $14 dollars of retail! The pictures are pretty self explainitory but here is what I did.
Step 1: took off rod iron
Step 2: 2 seperate coats of red paint
Step 3: Antiquing glaze(although you can't really see that through my pictures but it made a big difference)
Step 4: put the rod iron back on and it was done!
All for a BUCK!


Toddler Kitchen Accessories
So this one is a working project. I learned some lessons along the way and I am OPEN TO ANY TIPS YOU MIGHT HAVE:)
I am making what hopefully turns out to be an adorable little kitchen for my girl for Christmas and I happened to run across these little kitchen items at the DI all for $4! Sweet!
So I decided to keep the cute shopping cart silver because it already looks super cute. I'll add a gingham napkin that stis inside of it and then pile in the "grocery food".


I started with the Blue Ocean Breeze Krylon Spray Paint(ofcourse, my favorite) It went on very well.

Then I went on to paint the Moss Green and Lemon Yellow Krylon that DIDN'T go on so well. I don't know why there was such a difference but I think it mus thave been because of the different metals. I also made the mistake of not priming the metal. I tried wiping off the horrible looking paint then I used a glaze trying to make up for my mistake... bad idea. It doesn't dry as fast, it has to dry for 24 hours... oops.

Then I hung them up, wish I would have thought of this when I started. Then I would not have had the problem of the paper sticking to the paint! SO I still have lots of work to do but at least you can see what I'm going for here. They WILL BE CUTE DANG IT!

Seriously though, this project with the kitchen is going to take some time, none the less, it will be super cute by Christmas! :)
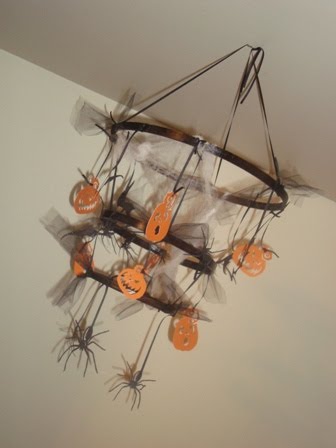
Halloween Chandelier
So here is my first NEW craft tutorial. I remembered this craft from someones blog last year and bought the supplies but never made it until yesterday.
Step 1: Use 3 different sizes of Cross Stiching looms(I got a bunch for $.50 at the DI)
Step 2: Tie together in tiers with ribbon, string, or what ever you wish. I did 3 ties from each loom to the next

Step 3: Spray Paint Black

Step 4: Accessorize with tulle, Halloween Shapes(I used my cricuit halloween cartridge with card stock for mine), and fake webs


Step 5: HANG FOR CREEPY FUN!

Saturday, September 11, 2010
Crafts I've Done/Craft To Do List
So potentially this could be a long list IF I could remember all I have done but I have a horrible memory... that's why I'm starting blog my projects.
Crafts and Projects I've done:
*Hair accessories for my lil' girl, flower clips, fabric smashed flower headbands
*Easter Dresses for my lil' girl
*ties for my lil' guy
*ruffle pants and matching top for my lil' girl
*fabric covered Mini Book of Mormon's
*Posie Clips
*Rolled rose appliques to my purse
*Rolled rose banner for my living room
*Grape vine lamp shades
*Entertainment Center redo w/blue ocean breeze krylon, antiquing, and quatrafoil stencil on top
*Halloween costumes for my lil girl, Anne Geddies baby, tutu cowgirl, Tinker Bell
*Jewelry(I tried)
*A multi wrap dress for myself
*Vinyl lettering for my cupboards
*Made a Love Sac
*Curtains for my bedroom
*wall art for my bedroom
*Dresser redo that stills needs a redo
*twirly skirts for my lil' girl
*trucker hat for my lil' boy
*scarf & mittens for my lil' girl
*blankets for the kids
*upright booster seat cover(don't want to do that again)
*Antique screen with vinyl lettering
*Kitchen table and chairs redo that also needs a redo
*baby slings, diaper pouches, burp cloths, and onesies
OK, so that's all I can think of right now.
Here is a PARTIAL list of what I WANT TO DO:
*pot rack from the back of my broken rocking chair
*Note holder from the seat of my broken rocking chair
*a little kitchen made from a shlf stand for my lil' girl
*U of U t's and hoodies for the fam
*Halloween Shandelier
*Lots of halloween vinyl for the windows
*diaper bag from oil cloth
*car seat canopy for my baby on the way
*more girl clothes
*peasant top for me
*skirt for me
*something boyish... I need help on this one
*halloween jammies for the kids
*Dinosour costume for my lil' boy
*Ballerina costume for my lil' girl
Inspired by others blogs:
*Crayon cozy
*craft cans
*household room signs
*earring holder
*fabric & magnetic fishing kit
*picture frame key holder
*kids ice cream shop from a box
*card table tents
*chicken wire picture holder
*vintage temple blocks
*halloween wreath
*burlap/weed wreath
*Christmas wreath
*sugar cookie lollipops


Meet Me~Julie
I love the craft blog craze going on and all the new ideas I have been getting from them. I have a small business on etsy where I sell designer budget books and coupon organizers. I could spend all day looking on the internet for either coupons or craft ideas, trust me, I have. I don't intend to but it happens.
This is one of four blogs I have begun. My other three are My Lil' Budget Book(where you can find lots of budget tips and coupon sites), Mormon Mommy-prenuer(yet to be published), and my own private family blog.
I LOVE LOVE new craft ideas and creating something different and unique for my family and my home. It gives me time to forget about how many poopy diapers and wet undies I have changed. I love being a mommy and have wonderful kids but I am so glad to have an outlet for creativity and for me!
I have a long list of items I have created and wish to create and would love to have a record to look back on as well as share ideas for others, ONE PROJECT AT A TIME.
I hope you will enjoy this blog as much as I will.
Subscribe to:
Posts (Atom)